How to Make a Foxed Mirror (A DIY Vintage Mirror Tutorial)
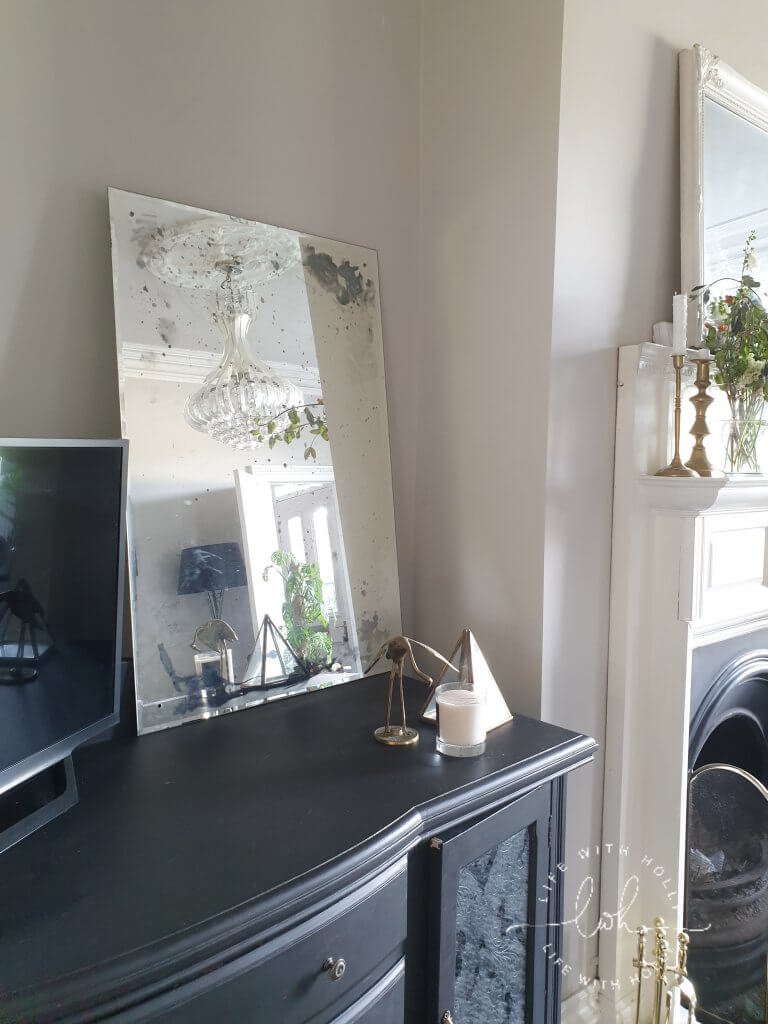
There’s something quite magical about an aged mirror. They look like a mirror who’ve seen things, you know? A mirror who’s lived. If a mirror has spots from age, it’s known as a foxed mirror and you can achieve the look without having to wait 100 years. Here’s how to create a foxed mirror.
Disclaimer – this post contains affiliate links, meaning if you purchase through one of those links I earn a small commission, at no extra cost to you. This helps keep the blog going, so thank you!
You will need:
- Your mirror. I used an old one from our bathroom that Hols has used for dancing about in front of for the past year. It lived in our bedroom, which possibly has more mirrors than a shop changing room. We’ve got the dressing table, the wardrobe doors, the one above the fireplace, the full length one hiding behind the wardrobe and this one. Too many mirrors?
- Paint stripper. I used this one from Amazon as it meant the man would bring it to me and I didn’t have to leave the house.
- Paint brush.
- Paint scraper
- Scrubby sponge/dish washing brush. Not wire wool. I tried this, and it was too rough.
- Bleach.
- Kitchen roll or something else absorbent to mop up the bleach.
Let’s fox that mirror!
So your first job is to lay your mirror shiny side down so you can see the back of it. Mine wasn’t in a frame but, if yours is, you might want to take it out to stop the frame being damaged.
Apply a layer of paint stripper according to the instructions on the back of the pack. The paint stripper I used recommended painting on a layer and leaving it for an hour before painting on another.
Go and have a cup of tea, sunbathe – do whatever while your paint stripper works.
I only painted on one layer as when I tried to scrape it off, the backing paint came off. I then scraped all over the mirror. Be careful not to scrape too hard as you’ll leave marks on the front of your mirror which you can’t get rid of. Give it a wipe over with a scrubby pad and then some wet paper towels to get rid of the residue and leave to dry. I didn’t even scrape all the old paint off, I couldn’t be bothered and this is meant to look aged and imperfect.


See? I missed bits and I don’t care.
Now, the fun bit. Mix up a weak bleach solution (one part bleach to four parts water) and drip this carefully onto your mirror. Where you drip the bleach the mirror coating will dissolve and leave darker patches. It’s these that give your mirror the aged look and that all important character. I used a syringe to drop the bleach on, but you can use anything. I also used a sponge to smear some of the bleach solution to create a different effect. Leave the mirror flat while the bleach dries, otherwise you’ll get run marks which look a bit rubbish.

Blot off any excess bleach and leave to dry. Once dry, you can paint the back of your mirror again – I’ve seen some people paint theirs gold, or black. I’ve left mine because I haven’t got a frame yet and haven’t decided where it’ll go. I’m trialling it at the top of the stairs to see if it makes a difference to the levels of light there!


So there you go, one foxed mirror. If you have a go, I’d love to see! Tag me on Instagram @life_with_holly x
For more hallway related posts, check out:
Victorian Hallway Makeover – Sanding Original Floorboards

How to Panel a Victorian Hallway (An Easy Tutorial!)


Can you show me the other tools you used? EspecIally the type of sponge/dish washing brush? There are so many not sure what is correct to use.
Was this. Multiple day project or able to get it done in one?
Thank you!!!
Hi Kristi, it really doesn’t matter too much which sponge you use – just use an old one you have at home. I did it all in one day.